
Read Time: ⏱️ 10 minutes | By: Luca
Section 1: Planning Your Cold-Side Setup
Setting up a commercial cellar means making smart choices about how beer flows, how much you spend, and how the process is laid out.
Every recipe made in the brewhouse depends on your cold-side equipment to turn raw sugars into a clear, stable, and finished product.
One of the most important choices when building or expanding is how to separate primary fermentation from final packaging.
You have to decide whether to route the beer through separate single-purpose tanks or handle the whole cycle inside one multi-purpose vessel.
Weighing the workflow and cost trade-offs of a split brite tank vs fermenter setup is a key step for a growing company.
By matching your tank pressure ratings and cone shapes to your weekly packaging targets, your team can remove bottlenecks.
Whether you supply a small taproom or run high-speed packaging lines, your cellar layout sets your daily labor costs.
Section 2: How a Primary Fermenter Works
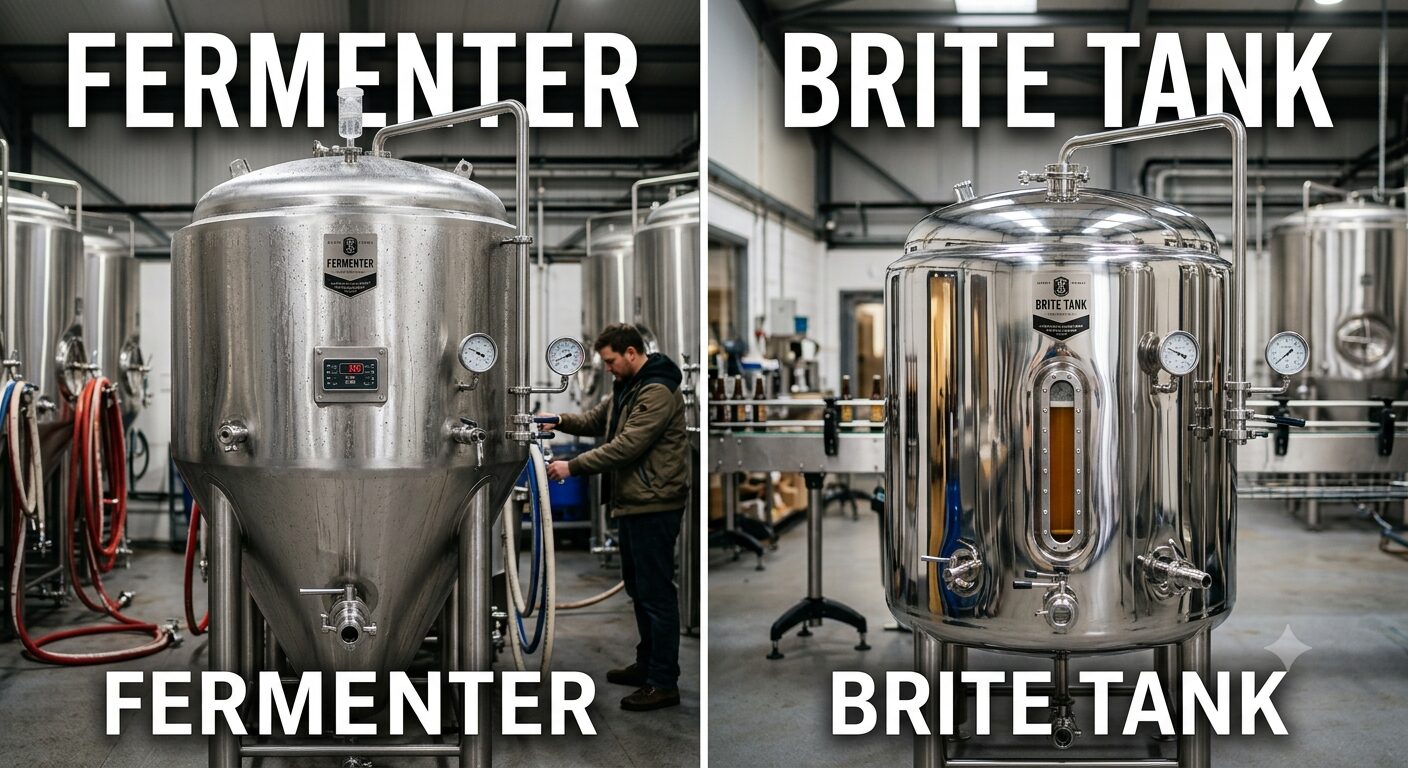
A traditional vertical fermentation tank is the main biological home where yeast turns wort sugars into alcohol and gas.
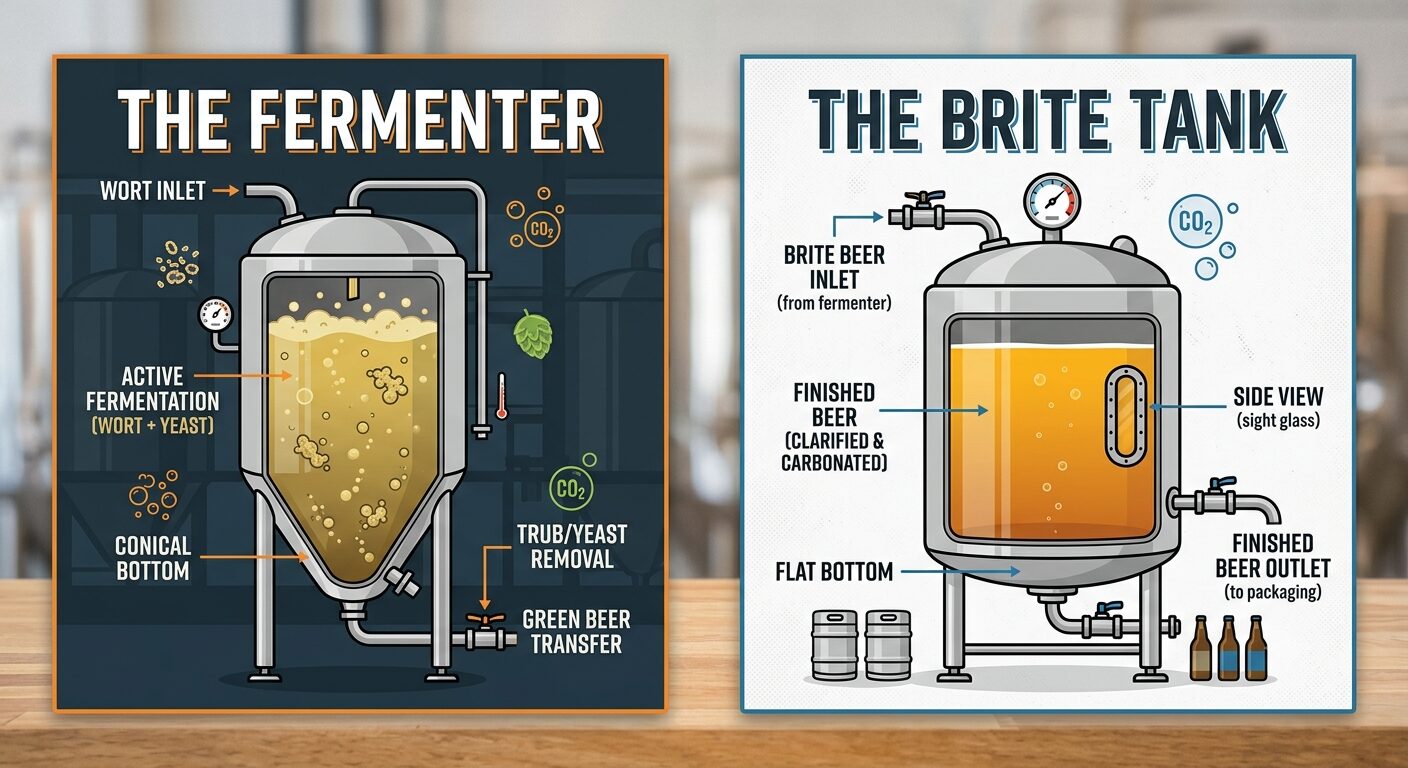
This layout pairs a tall, insulated cylinder with a steeply sloped 60-degree cone base.
That sharp cone uses gravity to pull heavy trub, spent hops, and dropping yeast down into a tight plug at the bottom.
By collecting the solids at the lowest point, the cellar crew can easily purge waste or harvest healthy yeast for future batches.
But standard Conical fermenters are built as low-pressure vessels, usually limited to pressures under 5 PSI.
Because they cannot safely hold high gas pressure, you cannot use them to force-carbonate finished beer with inline carbonation stones.
Instead, the uncarbonated beer has to move to a different tank to finish, clarify, and carbonate.
A fermenter can have a flat bottom or a conical bottom, depending on the type of system and the production needs.
A conical bottom helps collect yeast and sediment in one area, making it easier to separate them from the beer.
After fermentation, the beer can be transferred to a bright tank, where it becomes clearer beer before packaging or serving.
Section 3: What a Brite Tank Does
A dedicated bright or brite tank is a vessel built specifically to finish, clear, carbonate, and store your beer.
Unlike cone-bottom fermenters, a standard brite tank has a dish-bottom or shallow flat floor.
Since the heavy yeast and trub were already left behind in the primary tank, a deep 60-degree cone is no longer needed.
A professional brite tank has a strong high-pressure rating, so it can handle continuous working pressures of 15 to 30 PSI.
That high rating lets brewers use inline carbonation stones to quickly force-carbonate the beer.
The dish-bottom design also keeps the liquid level steady, which makes it ideal for feeding automated canning lines or keg fillers.
Moving the beer to a dedicated brite tank frees up your primary vessels right away, so you can start another batch.
Calculating Carbonation Pressure
The pressure supplied to a carbonation stone should not be selected by guesswork.
The required setting depends on the beer temperature, target carbonation volume, liquid depth, local altitude, and the wetting pressure of the stone.
A practical calculation considers:
Stone pressure = equilibrium pressure + hydrostatic pressure + stone wetting pressure
The equilibrium pressure comes from a carbonation chart based on the beer temperature and desired volumes of carbon dioxide.
Hydrostatic pressure increases with the height of the beer above the stone, while wetting pressure is the minimum gas pressure needed to create bubbles through the stone’s pores.
After reaching the target carbonation level, the beer should rest under the correct equilibrium pressure before packaging. Carbonation should then be verified with a calibrated measuring instrument. (Gorman & Smith Beverage Equip)
Simply increasing the CO₂ regulator until bubbles appear is not a reliable carbonation method.
The stone must overcome its own wetting pressure and the weight of the beer above it before carbon dioxide begins entering the liquid correctly.
Temperature also matters. Colder beer absorbs carbon dioxide more easily, so the brewer should calculate the pressure using the real tank conditions rather than copying a setting from another vessel.
Stabilizing the Packaging Line
A brite tank acts as a controlled buffer between beer production and packaging.
The packaging line can draw finished beer from a vessel maintained at a stable temperature, pressure, and carbonation level.
This consistency reduces sudden changes at the filler that can cause excessive foam, inaccurate fill volumes, carbonation losses, and product waste.
The tank must be large enough to supply the packaging line without interruption but should not hold finished beer longer than necessary.
The packaging team should monitor beer temperature, tank pressure, carbonation level, and remaining volume throughout the run. These values can then be compared with filler performance and package quality. (cassmanmachine.com)
Packaging equipment works best when the beer arriving from the cellar does not keep changing.
A brite tank gives the filler a steady supply of cold beer at a controlled pressure. This helps reduce foam and makes fill levels more consistent from the beginning to the end of the run.
The tank therefore does more than store finished beer. It protects the rhythm and efficiency of the entire packaging operation.
Section 4: Doing It All in One Unitank
To cut the product loss and labor caused by moving beer between tanks, manufacturers developed the modern unitank.
A unitank has the same vertical, cone-bottom shape as a standard fermenter but uses thicker steel plates and reinforced support bands.
These upgrades let the vessel safely handle continuous working pressures of 15 to 30 PSI.
Working under pressure completely changes how a cellar team manages packaging timelines.
Brewers can close the gas arm near the end of the cycle to trap natural carbon dioxide inside the beer.
This natural pressure carbonates the beer while keeping it safely sealed away from damaging oxygen.
A unitank also has permanent sanitary ports for high-pressure carbonation stones, rotating racking arms, and sample valves.
That lets you ferment, drop yeast, cold-crash, and fully carbonate the beer inside one sealed vessel with no extra transfers.
Comparing these multi-use tanks helps managers pick the Best fermenter types to make the most of their floor space.
Comparing Long-Term Ownership Costs
The financial comparison between a brite tank and a unitank should include more than the initial purchase price.
A dedicated brite tank generally has a simpler internal design because it does not require the same cone geometry or yeast-harvesting functions as a unitank.
This may reduce the cost of purchasing or replacing the vessel. It can also simplify some maintenance tasks because fewer components are involved in active fermentation management.
However, a split system requires additional floor space, transfers, valves, piping, cleaning cycles, and labor.
The brewery should calculate the total ownership cost over several years, including installation, utilities, maintenance, cleaning, product loss, and eventual tank replacement.
A brite tank may cost less than a unitank, but the tank price is only one part of the decision.
A two-vessel workflow also needs more connections, more cleaning, and more cellar space. On the other hand, replacing a simple brite tank may be cheaper than replacing a multi-purpose pressure vessel.
The best choice is the one that produces the lowest total operating cost for the brewery’s real production schedule.
Section 5: Choosing the Right Tank Size
To keep an efficient layout, every growing beverage company should pick tank sizes that match its brewhouse batch size.
For research labs, small startups, or recipe development, a compact 1 bbl fermenter is the standard choice for pilot testing.
These small setups let you check yeast performance and test new ingredients without risking large amounts of raw materials.
As a business grows into a neighborhood taproom, most operators move up to a 5 bbl fermenter to supply their draft lines.
For startups launching with local draft accounts, a 7 bbl fermenter is the classic entry-level production size.
Moving up to a 10 bbl fermenter gives growing taprooms the extra volume to support packaging lines like mobile canning.
As local demand climbs, a 15 bbl fermenter or a heavy-duty 30 bbl fermenter improves labor efficiency.
Finally, a 90 bbl fermenter provides the volume to keep high-speed canning and bottling lines running all the time.
Calculating the Number of Brite Tanks
A brewery does not normally require one brite tank for every fermenter because the beer remains in the brite tank for a much shorter period.
A common starting point is approximately one brite tank for every four or five fermenters. However, the final ratio must reflect the actual packaging schedule.
Important factors include:
- Average fermentation and conditioning time
- Number of fermenters emptied each week
- Brite tank residence time
- Packaging-line speed
- Number of beer styles packaged separately
- CIP and sanitation time
- Weekend and shift schedules
A brewery running several packaging lines or keeping finished beer inside brite tanks for extended periods may require additional capacity.
The calculation should be based on the busiest production week rather than the annual average. (Micet Group)
You usually do not need as many brite tanks as fermenters.
Beer may occupy a fermenter for several weeks but remain in the brite tank for only a day or two before packaging. This allows one brite tank to receive beer from several different fermenters during the same production cycle.
The commonly used ratio of one brite tank for every four or five fermenters is only a starting point. The brewery’s real packaging schedule should decide the final number.
Minimum Working Volume
A brite tank may have a minimum recommended filling volume even when its total capacity is much larger.
The beer level must cover enough of the cooling-jacket area for the glycol system to control temperature effectively.
When the tank contains too little beer, the active jacket may sit partly or completely above the liquid. This can result in slower cooling, unstable temperature control, and inaccurate readings from poorly positioned sensors.
Before purchasing a tank, ask the manufacturer for:
- Total internal volume
- Recommended working volume
- Minimum fill volume
- Cooling-jacket position
- Thermowell height
- Performance during partial fills
This information is especially important when the same brite tank will receive batches of different sizes. (Brewtools Documentazione)
A half-empty brite tank does not always cool as effectively as a full one.
If the beer level sits below the main glycol jacket or temperature probe, the control system may not represent what is really happening inside the liquid.
Ask for the minimum operating volume before ordering the vessel. This small detail becomes important when the brewery plans to package partial or experimental batches in a larger tank.
Section 6: Using One Vessel Across Different Drinks
The core rules of temperature control, cleaning, and fluid transfer apply across every professional drink industry.
In the wine industry, a dedicated WINE FERMENTER uses wide shapes to manage the cap of grape skins during red wine maceration.
White winemakers, cider producers, and mead makers often use vertical conical tanks that look exactly like standard beer gear.
This overlap lets microbreweries easily add small, niche drinks to their product line.
Setting up a beer brewing fermenter for multi-drink work means using flexible temperature control systems.
To study how different yeast strains react to different tank shapes, production teams read the manuals shared by the Siebel Institute of Technology.
Understanding these fermentation basics helps your team keep quality high across every product style.
Section 7: Secondary Aging and Separating Yeast
Managing your yeast across several generations keeps raw-material costs low and fermentations consistent.
In a traditional two-stage process, brewers move the young beer off the primary yeast into a dedicated secondary fermenter.
This secondary tank works well for long aging, wood-chip additions, or adding specialty fruits and spices.
Moving the beer to a clean tank keeps it from sitting on dead yeast too long, which prevents rubbery off-flavors from yeast autolysis.
A high-pressure unitank removes the need for that transfer by letting you dump yeast straight out of the bottom cone.
By opening the lower valve, the cellar team can remove trub and harvest healthy yeast without exposing the beer to air.
To study yeast biology and healthy harvesting, production managers read the journals shared by the American Society for Enology and Viticulture (ASEV).
Flavor Development During Brite-Tank Conditioning
Brite-tank conditioning is not limited to visual clarification and carbonation.
During a controlled cold holding period, the beer can continue developing a smoother and more integrated flavor profile.
Remaining yeast and suspended particles settle, while harsh or unfinished aroma characteristics may become less noticeable.
Stable temperature and pressure also help the brewery reproduce the same finishing conditions for every batch.
The required conditioning period depends on the beer style. A fresh, hop-focused beer may require a short residence time, while a lager or strong beer may benefit from a longer controlled maturation.
Sensory checks should be completed before packaging alongside measurements of carbonation, temperature, clarity, and dissolved oxygen. (NFE Brew)
A brite tank does more than make the beer clear and fizzy.
A short period of stable cold conditioning can help the flavors settle into place and give the beer a more finished character before it reaches the can, bottle, keg, or tap.
The correct timing depends on the recipe. A delicate hoppy beer may need to move quickly, while a lager can benefit from a longer and calmer finishing stage.
Clarification Before the Brite Tank
Beer does not always rely only on gravity to become clear inside the brite tank.
Medium and large breweries may install a centrifuge or filtration system between the fermenter and the brite tank.
A centrifuge separates suspended yeast and other particles while the beer moves between the two vessels. This can shorten clarification time, increase yield, and reduce the sediment entering the brite tank.
Filtration systems can also remove particles through depth or surface-filter media.
These systems require additional capital, maintenance, cleaning, and process control. They may also affect desirable flavor or foam components when operated too aggressively.
The brewery should choose the clarification method according to its target appearance, beer style, packaging volume, and available budget.
The brite tank does not have to perform the entire clarification job by itself.
A growing brewery may place a centrifuge or filter between the fermenter and the brite tank. This removes much of the remaining yeast and sediment before the beer reaches its final holding vessel.
The result can be faster processing and less sediment, although the extra equipment adds cost and must be adjusted carefully to avoid removing desirable beer character.
Section 8: Steel Grade and Surface Polish
The steel blend and inside finish of your tanks directly affect your beer’s shelf life and daily cleaning costs.
Beverage tanks must be built from high-grade stainless steel, usually AISI 304 or the more acid-resistant AISI 316L.
These alloys contain plenty of chromium and nickel, which form a self-healing protective layer on the metal.
This layer protects the tank from cleaning acids, hard water, and the natural acidity of fruit and hops.
To stop bacteria from taking hold, the inside steel must be polished smooth, to a roughness of 0.8 micrometers or less.
Any rough spots, weld lines, or scratches can shelter wild yeast and hide them from a microbrewery fermenter cleaning run.
To set safe cleaning temperatures and protect your staff, the Master Brewers Association of the Americas (MBAA) offers complete safety guides for cellar work.

Section 9: Brite Tank vs. Fermenter Comparison Table
Choosing between a split-vessel setup or an all-in-one unitank means weighing the key hardware limits.
The table below shows the main mechanical differences between common cellar vessels:
| Mechanical Design Element | Standalone Low-Pressure CCT | Dedicated Pressurized Brite Tank | High-Pressure Industrial Unitank |
| Floor Base Geometry | 60° Steeply Pitched Cone | Dish-Bottom or Shallow Slope Floor | 60° Steeply Pitched Cone Base |
| Maximum Working Pressure | Low Pressure (< 5 PSI maximum) | High Pressure (15 to 30 PSI) | High Pressure (15 to 30 PSI) |
| Primary Production Focus | Aggressive sugar breakdown and yeast collection | Fine clarification, force carbonation, and storage | Full-cycle processing from pitching to packaging |
| Oxygen Ingress Risk Profile | Low (Vessel stays closed during fermentation) | Higher due to transfer pipe setup | Zero (Single-tank design prevents movement) |
Vertical vs. Horizontal Brite Tanks
Vertical brite tanks provide more storage capacity within a limited floor area, making them suitable for compact production cellars.
Their greater liquid depth also gives carbon dioxide bubbles a longer distance to travel before reaching the surface. This can support efficient gas dissolution during carbonation.
Horizontal brite tanks require more floor space but fit more easily inside buildings with low ceilings. Their valves and access ports may also remain at a more convenient working height.
However, horizontal designs can require careful spray-device placement to ensure complete CIP coverage across the full vessel.
The brewery should compare ceiling height, floor area, carbonation performance, operator access, and cleaning requirements before selecting the final orientation. (SKE Equipment)
A vertical brite tank saves floor space, while a horizontal one saves height.
The right choice depends heavily on the building. A tall cellar can usually benefit from vertical tanks, especially when the brewery wants to place several vessels close together.
Horizontal tanks can be a practical solution for basements or low production rooms, but they occupy more floor area and may be harder to clean evenly.
Section 10: Automated Clean-In-Place (CIP) Cleaning
Keeping your whole cellar perfectly clean is the single most important factor in protecting your brand and shelf life.
To clean these large tanks without manual scrubbing, plants use automated Clean-In-Place (CIP) loops.
The CIP setup uses a high-flow spray ball in the top dome to push cleaning fluids across every inside surface.
A standard CIP run starts with a fresh-water pre-rinse to remove heavy yeast cakes and loose material.
Next, a heated caustic solution (sodium hydroxide) is pumped through the loop at 60°C to 80°C to break down oils and proteins.
After a quick rinse, an acid wash of phosphoric and nitric acid dissolves hard minerals like calcium oxalate scale.
To check how well the cleaning worked, quality teams use automated ATP swabs to confirm the tank is sterile.
For advice on removing stubborn mineral scale without scratching the polished steel, producers follow the manuals shared by the Brewers Association.
Section 11: Real-Time Density Sensors and Tracking
The drinks industry is moving to digital systems that turn traditional cellars into connected, data-driven networks.
In the past, a cellar worker had to draw a sample from every active tank each day to check the sugar level with a glass hydrometer.
This manual step takes labor hours, wastes beer, and adds a small contamination risk every time the valve is opened.
To fix this, modern facilities install digital inline density sensors right into the tank walls.
These sensors use continuous pressure data or sound frequencies to track sugar drop in real time and send alerts to the brewer’s phone.
If a batch slows down unexpectedly, the software warns the team early so they can adjust the temperature before it stalls.
To balance these automated systems with classic flavor, production teams consult the Australian Wine Research Institute (AWRI) on how processing changes affect long-term aging.
Sight Glasses and Level Monitoring
A sight glass allows the cellar team to check the beer level inside the brite tank without opening the vessel.
This can help operators monitor transfers, prevent overfilling, confirm the remaining packaging volume, and identify unexpected product losses.
The sight glass should use sanitary connections and be positioned where it can be read safely during normal operation.
Because every additional fitting creates another surface that must be cleaned, the sight glass and its valves should be included in the tank’s CIP and inspection procedures.
Larger breweries may replace or support visual inspection with digital level sensors connected to the cellar control system.
A sight glass gives the packaging team a quick view of how much beer remains inside the tank.
This is especially useful during long canning or kegging runs because the operator can follow the falling liquid level and prepare for the end of the batch.
It may look like a simple accessory, but it still needs a sanitary design and regular cleaning. A difficult-to-clean sight glass can create more problems than it solves.
Dissolved Oxygen Checks from Transfer to Packaging
A brewery should measure dissolved oxygen at several points rather than checking only the packaged product.
Useful measurement points include:
- Beer before transfer
- Beer immediately after entering the brite tank
- Beer inside the brite tank before packaging
- Product manifold before the filling heads
- Finished cans, bottles, or kegs
A significant increase after the transfer may indicate an incomplete tank purge, air inside the hoses, a leaking gasket, or oxygen entering through a pump or valve.
The brewery should record dissolved oxygen together with tank pressure, beer temperature, carbonation level, transfer time, and filler settings.
Tracking these values batch after batch helps the team identify exactly where oxygen is entering the process and correct the problem before shelf-life is affected. (Brewing Industry Guide)
Measuring oxygen only after packaging tells you that a problem exists, but not where it started.
Check the beer before and after it enters the brite tank, then measure it again at the filler and inside the finished package.
When the readings are logged consistently, the brewery can see whether oxygen entered through the transfer line, a gasket, the tank purge, or the packaging machine. This turns oxygen control from guesswork into a traceable process.
Section 12: Summary and Final Recommendation
Deciding between a classic brite tank vs fermenter split workflow or an all-in-one unitank system takes a clear view of your production goals and cash flow.
If your business runs a taproom model where space is tight but you need many bright serving tanks to supply draft taps, separate brite tanks offer clear advantages.
But if your goal is a fast-moving wholesale packaging line focused on labor savings and strong oxygen protection, high-pressure unitanks are the better solution.
Be sure to check your building’s floor-weight limits, plan for plenty of headspace, and enforce strict automated CIP loops.
By matching your equipment to your volume goals and treating your cellar as a key partner, your team can keep delivering great beer.
Contact Us